Home Improvement

How to Select a Stucco Contractor

Philadelphia Stucco Contractor is a skilled professionals who restore and enhance your home’s surface area. They provide high-quality workmanship that improves your home’s value and performance over time.

Choosing the right stucco contractor requires careful research and proper vetting. Checking a contractor’s portfolio and client references is an important first step.

Experienced contractors have superior supplier contacts, which can save you money on quality products. They are also familiar with local building codes and regulations, which streamlines the process for you.

Experience

Stucco contractors have years of industry experience under their belts, which can help ensure the job is completed correctly and promptly. This will prevent you from having to rework the job in the future due to poor workmanship, misapplication of materials, or other issues. Additionally, industry longevity is a good indication of customer satisfaction and professionalism. When selecting a stucco contractor, it is also important to review their portfolio and references. This will help you identify whether their work aligns with your vision and style preferences.

Obtaining detailed quotes from multiple contractors is a good way to compare pricing and services. This will allow you to choose a contractor who best fits your project needs and budget. It is essential to avoid a contractor who provides unusually low bids without a clear explanation, as this could indicate subpar materials or hidden costs.

A good stucco contractor will be able to provide you with a comprehensive warranty and service guarantee. This will give you peace of mind that the contractor stands behind their work and is committed to quality results. Ensure that you understand the terms of the warranty and any other details related to it before signing a contract.

Local stucco contractors have in-depth knowledge of the area’s specific building codes and regulations. They will be able to streamline the process of getting permits and inspections, which can save you time and hassle. They may also have established relationships with suppliers that can result in lower material prices, saving you money on your project. They are also familiar with the unique threats that stucco faces in your area, such as high moisture levels and pests.

License

Stucco is a unique construction material and requires specialized skills. Choosing the right stucco contractor is critical to your project’s success. It’s essential to find a skilled professional who can perform quality work at a fair price. The best way to do this is to ask targeted questions that will help you find the right candidate for your job.

First, look for a plastering contractor with years of experience in the industry. This will show that they have a proven track record of completing high-quality projects. They will also have the necessary tools and materials to finish the job quickly and efficiently.

Additionally, make sure to check whether the contractor is licensed in your state. Licensing is a key indicator of professionalism and ensures that the contractor adheres to industry standards. It’s also important to verify that they have insurance, which should cover liability and workers’ compensation in the event of an accident or injury.

Another important consideration is whether the contractor offers a warranty on their work. This will give you peace of mind that the work is of high-quality and will last for a specified time frame. Additionally, you should choose a contractor who provides maintenance services to keep your stucco looking its best.

When it comes to hiring a plastering or stucco contractor, you want to be sure that they are licensed and insured in your state. A license will demonstrate that they have passed a background check and have met minimum licensing requirements. You should also look for a plastering or stucco contractor with years of experience in the industry and a strong portfolio of completed projects. These indicators will help you determine if they are the right fit for your project.

Insurance

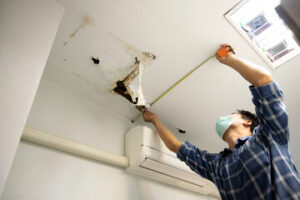
Stucco is a very delicate material that needs to be installed properly to prevent cracking and other damage. Improper installation can result in moisture trapping within walls, causing mold and mildew as well as rotted wood or termite infestation. Homeowners are often left paying for expensive repairs or even seeking help from their insurance companies. This is why hiring a stucco contractor with insurance and a portfolio of client references is so important.

Besides being licensed, a good plastering and stucco contractor will carry liability and workers’ compensation insurance. General liability insurance covers third-party property damage and bodily injury, while workers’ compensation covers employee work injuries. The ideal policy should also cover tools and equipment, as many contractors have a large amount of investment in their tool sets and can suffer a loss if they are stolen or damaged on the job.

Plastering and stucco contractors can often be found on construction sites where they are exposed to various risks. For instance, they are vulnerable to property damage from wind and rain that could erode the surface, as well as other weather events that can cause costly interruptions to work. Additionally, they are likely to need commercial auto insurance, as they will transport materials and equipment from their homes to job sites.

A reliable stucco and plastering contractor will offer business owners a comprehensive insurance package that includes professional liability, commercial auto, workers’ compensation, contractors tools and equipment and a Business Owners Policy (BOP). By working with a broker who has access to over 240+ carriers, they can find you the right policy to protect your company from any potential perils. They will also assist you in navigating the confusing world of insurance and offer advice to help reduce your premiums.

Portfolio

A stucco contractor’s portfolio is a critical tool for determining their suitability to work on your project. Look for a wide range of projects, including both new construction and repair. This will help you choose a contractor with the skills and experience to handle any challenges that might arise. A well-presented portfolio will also demonstrate their attention to detail and craftsmanship.

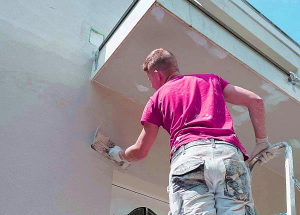
Stucco is a time-honored building material that has been adorning structures for centuries. It is a mixture of cement, lime, sand and water that creates an eye-catching, textured finish. In addition to protecting a home or commercial property from the elements, stucco adds character and charm. Its unique appearance is what sets it apart from other siding materials such as wood, vinyl and metal.

Choosing the right contractor is crucial to ensuring that your project is completed on time and within budget. Look for a contractor who has a strong reputation and excellent customer reviews. Additionally, choose a contractor who uses high-quality materials and modern techniques. This will ensure that your finished product is durable and aesthetically pleasing.

While stucco may seem like a simple application, it requires the expertise of a qualified contractor. A seasoned contractor will have an in-depth understanding of various architectural styles, as well as the ability to overcome any challenges specific to NYC’s dynamic urban environment.

A professional stucco contractor will have a wealth of experience in repairing and installing both traditional and EIFS (Exterior Insulation and Finishing Systems) stucco. EIFS is a synthetic type of stucco that provides more protection against moisture than traditional stucco. It is also more energy efficient, as it regulates temperatures and keeps a home or business cooler in the summer and warmer in the winter.

Warranties

Stucco repair contractors who offer warranties provide homeowners peace of mind and enhance resale value. Typically, these warranties cover both the material and labor for the duration of the warranty term. The warranties may also include other materials such as metallic mesh, paints, and primers. If the contractor does not offer any type of warranty, this may be an indication that they are using substandard materials or lack quality workmanship.

A stucco warranty can prevent moisture intrusion and mold issues that are often associated with the improper installation of stucco materials. Moisture issues can lead to mildew, rot, and other structural problems, which require extensive repairs to rectify. Having a stucco warranty can help you avoid the costly consequences of moisture damage, and ensure that your project is completed properly from start to finish.

Testimonials, references, and referrals are great ways to assess a stucco contractor’s level of skill and quality work. Look for these features on the contractor’s website or social media accounts to learn more about the positive experiences that other clients have had with the company.

A well-respected and reputable stucco contractor will have a large portfolio of past projects. Examine the images in this portfolio for consistent quality and attention to detail. Also, look for a finished product that is smooth and even with no cracks or uneven textures.

The MoistureFree Warranty provides a solution to the many problems that synthetic EIFS and hardcoat stucco homes face, including negative stigmas, reluctance by Realtors to sell these types of homes, and expensive moisture repairs. MoistureFree offers a low cost and simple process to obtain a warranty, and it covers all of the expenses related to moisture inspections and remediation for the duration of the warranty term.

Home Improvement

Prepping Your Home For A Paint Job – Step-By-Step Guide

A fresh coat of paint can refresh your home, open up new design possibilities, and help you get the look you want. But before your professional Wilmington Painter arrives, it’s important to prep the area.

That includes removing or covering furniture, putting away any photos or wall hangings, and taking other steps to ensure a smooth painting process.

painting

Clear And Protect The Area

Whether you’re painting your own home or hiring professional painters, clearing and protecting the area is one of the most important steps to take. You don’t want your belongings to be damaged by splatters or dust while the work is being done.

For example, it’s a good idea to remove rugs from rooms that are being painted and put them in a garage or other storage space for the duration of the project. This will prevent scuffs and stains on the floors. It’s also a good idea to move furniture away from walls or push it to the center of the room so that it isn’t in harm’s way. If you have doors that open into the room, you should add a doorstop to keep them from swinging into the walls and damaging them.

If there are any breakable or irreplaceable items that you can’t move, cover them with blankets or canvas drop cloths to protect them from splatters and dust. You should also remove light switches and outlet covers in rooms that are being painted, as well as any decorative features like mirrors or clocks. This will help ensure that your heirlooms are safe during the painting process. If you have outdoor furniture or planters, it’s a good idea to move them or cover them with canvas or plastic sheeting to prevent paint from dripping on them.

Clean The Surfaces

When it comes to prepping your home for painting, cleaning is one of the most important steps. It’s not just about dusting surfaces, but actually getting rid of old paint and sanding down any rough areas before you begin applying new coats of paint. During this process, you can also make any necessary repairs to damaged areas like nail holes or dents.

Begin by vacuuming to suck up any loose debris. Then, wash the walls with soap and water to remove any dirt and grease. This will help ensure that your finished paint job is as beautiful as possible.

Once the walls are clean, you’ll need to tape off any areas that you don’t want painted, such as molding around windows or baseboards. This will help make sure that your professional painters get nice, clean lines without accidentally painting over something they shouldn’t have.

It’s also a good idea to lay down drop cloths on floors and cover any furniture that you can’t move. Doing this will protect your carpets and other flooring surfaces from any drips of paint that may happen, no matter how experienced your painters are. You should also cover any light fixtures and ceiling fans with plastic to prevent them from getting messed up. If you have any plants or flowers in the area, be sure to cover them with canvas tarps too. This will help keep any paint debris from killing them while the project is underway.

Repair Any Damages

If you’re painting the interior of your home, it’s a good idea to remove any knick-knack items from the work area. The painters might accidentally knock them over or they could get painted by mistake. Having them stored away before they arrive is the best way to keep them safe.

Also, it’s important to remove any rugs and mats that might be in the area of the rooms you’re having painted. Paint is a liquid that can easily splatter, staining fabric items like rugs and mats. You can store these items in a closet or basement until after the paint job is done.

The last step of prepping your home for a paint job is to make any repairs. If you’re painting over a previously painted surface, this is the time to scrape off any flaking or peeling paint and then sand the wall down. You should also re-caulk around doors and windows to prevent water, dirt, and other elements from damaging the wood around them.

This might seem like a lot of preparation to do before a painter arrives, but it’s essential for both your safety and the quality of your paint job. If you’re not comfortable doing any of this on your own, contact the team at Tribble Painting Company to learn more about our interior and exterior home painting services. We have years of experience with both and would be happy to help you prep your home for a new paint job.

Prime If Necessary

It’s important to make sure that any areas that will be painted are properly primed. This will help the paint job last longer and look better. Primer also helps to prevent the old color from bleeding through the new coat of paint. It is especially necessary if you are changing from a dark to a light color or vice versa. A tinted primer can also be helpful when covering a darker color as it will more easily hide it.

If you are using a primer, be sure to use one that is water-based and compatible with your paint. If you aren’t, the primer will be absorbed by the new paint, which can cause it to crack or peel over time.

Before the painters come in, you should remove any furniture, decorations, or other items from your walls. This will allow them to work more quickly and will protect your belongings from damage. It is also a good idea to store wall hangings in a safe place until the painting is finished.

Also, you should cover any items that you don’t want to get paint on, like garbage bins, outdoor hose bibs or racks, flower beds, and shrubbery. This will protect them from paint drips and spills. If you don’t have time to move the objects or can’t cover them, you should at least put down plastic or drop cloths.

Choose The Right Paint And Tools

Choosing the right paint and tools is crucial for a professional, lasting finish. Investing in high-quality brushes, rollers, and pads will make your job much easier and help you achieve the look you want. Avoid cheap, patterned, or textured rollers, as these are difficult to control and may not produce the results you’re after.

When it comes to interior painting, be sure to remove all wall art and decorations before the painters arrive. This will allow them to work efficiently and will ensure that your belongings stay safe. It’s also a good idea to take down any curtains or wall hangings that hang over furniture. This will prevent them from being accidentally damaged by drips of paint.

You should also clear out any cabinets or closets that you plan on painting. This will make the project a lot easier for the painters and will ensure that your belongings are not in danger of being knocked over or accidentally touched by paint.

If you’re planning on hiring a residential painting company, be sure to discuss any special requirements with them ahead of time. For example, you might need to vacate the space for a day or two while they’re working, so they can get their work done quickly and thoroughly. You should also identify with them where they will be able to safely store their equipment and clean up their supplies afterward.

Apply The Paint

Painting your home’s interior can be a rewarding and exciting DIY project. But don’t skip the prep work—it’s what makes all the difference when it comes to a high-quality finish and the longevity of your paint job.

The most important prep step is cleaning the surfaces you plan to paint. Use a damp cloth to wipe down walls and woodwork, and be sure to remove any dust or cobwebs. Vacuuming is also a good idea to get rid of any particles that could get stuck in the fresh paint and cause peeling or bubbling later on.

After washing your surfaces, you’ll want to let them dry thoroughly before beginning the actual painting process. This can take a few days, so it’s best to do this the day before you want your professional painting crew to start working.

Lastly, you’ll need to prepare any furniture for moving. This may mean removing wall hangings like photos and clocks or relocating them to another room to avoid any potential damage. Removing heavier furniture items also makes it easier for the painters to navigate the room.

Next, cover any unused doors or light fixtures with plastic and tape the edges. Masking can be especially helpful around electrical outlets but always consult with your painting crew about any areas that need to be left untouched. Finally, make sure to lay down drop cloths on floors and other non-wall surfaces to protect them from paint spills.

Home Improvement

The Pros and Cons of Hardwood Flooring

Hardwood floors are an excellent option for many homeowners. They’re beautiful, durable, and add value to your home.

Hardwood Flooring

However, there are some drawbacks to hardwood flooring. They’re expensive and sensitive to moisture. They can also be susceptible to scratches and dents. They can also change color over time. Fortunately, they’re easy to repair with sanding and refinishing.

Hardwood floors add a natural texture that enhances the beauty of any space. In addition, they work well in most home styles and are easier to pair with other furniture and decor choices than carpets. Additionally, hardwood is durable enough to last a long time and can be refinished multiple times in its lifespan to refresh the look.

Choosing the right wood flooring color is also important. Lighter shades can make small spaces feel bigger and more spacious while darker tones can create a cozy atmosphere. Additionally, evaluating the existing design and style of a home is critical, as different types of wood can clash with certain designs.

Popular hardwood species include oak, maple, and walnut. Oak has a natural beauty that works with traditional and contemporary styles while maple is known for its strength and consistent coloring. Walnut, on the other hand, is prized for its rich colors and elegant appearance. These hardwoods can resist dents and scratches, making them ideal for high-traffic areas.

The shade of a hardwood floor will also affect its ability to hide dirt, dents, and scuff marks. Darker shades tend to be more resistant to stains, but they may show scratches and scrapes more easily than lighter shades.

Another benefit of hardwood is that it comes from a renewable resource and is therefore considered more environmentally friendly than other flooring materials. Furthermore, wood doesn’t trap allergens and other contaminants like carpets and can be disinfected quickly. This is especially beneficial for homes with children and pets as it improves air quality and reduces irritants that can cause asthma and allergies. It also aligns with the principles of biophilic design, which aims to incorporate elements of nature into interior spaces to positively impact health and wellness.

Durability

Hardwood floors are durable, but they’re not indestructible. Like any flooring, they can be damaged by heavy foot traffic and constant sunlight. Whether or not your hardwoods are prone to damage, regular maintenance and preventive measures can extend their lifespan. Using doormats and encouraging family members to remove their shoes before entering the home, placing felt protectors on the feet of furniture, and rearranging your furniture occasionally will all help to prolong the life of your hardwood floors.

When assessing wood flooring durability, one of the most important factors is its hardness, which can be measured by an industry-standard test called the Janka Hardness Rating. This test determines how much force is needed to embed a steel ball halfway into different species of wood flooring. Oak, for example, has a Janka rating of 1300 and is known for its durability.

Another consideration is how a particular type of hardwood flooring holds up to changes in humidity levels. Solid wood can develop cupping if it’s exposed to high moisture levels over time, which can result in gaps between boards and other problems. Engineered hardwoods, on the other hand, are able to withstand humidity levels that would cause solid wood to warp and swell, so they’re ideal for areas of the home that will be exposed to moisture.

It’s worth noting that the durability of engineered hardwood is often dependent on the quality of plywood used to create it and the glues that are used to hold the layers together. Vermont Plank flooring is ahead of the curve on this, utilizing only top-quality plywood and non-toxic formaldehyde-free glues to manufacture our engineered hardwoods. The use of these superior materials will ensure that your new engineered hardwood floors can stand up to the challenges posed by changing humidity levels and years of high-traffic usage.

Maintenance

Hardwood flooring adds value to your home and lasts longer than other types of flooring materials. It can be sanded and refinished several times over the years to keep it looking like new. Carpet floors, on the other hand, must be replaced after a few years due to damage from dust and debris. Hardwood flooring is also hypoallergenic and can help to improve indoor air quality by removing dust and allergens.

However, hardwood can be susceptible to scratches and dents from everyday wear and tear. It is important to choose a hard wood species and use felt protectors under furniture legs to prevent damage from heavy furniture or high heels. Hardwood flooring can also be damaged by excessive moisture, which can cause warping and buckling. It is also more expensive to install than some other types of flooring.

Engineered hardwoods are more durable than solid wood and can be installed over many different subfloors, including concrete. They can also be sanded and refinished multiple times, but are less expensive than solid hardwoods. They are less sensitive to moisture than solid hardwoods and can be used in basements.

Although some people prefer the look of hardwood floors, it can be difficult to maintain properly. The wood can scratch easily if not cared for correctly, and can become discolored with prolonged exposure to sunlight. It is recommended to use window treatments that provide a low e-coating, which will help to block out UV rays and protect the color of the hardwood. It is also a good idea to regularly rearrange furniture and rugs so that the floor gets even exposure to sunlight.

Noise

Hardwood flooring is a beautiful, natural material that adds a sense of style and luxury to any home. However, if it is not properly installed and cared for, it can become noisy and require expensive repairs. To avoid this, it is best to hire a professional flooring installer. They will ensure quality products and installation techniques that will last a lifetime.

Wood floors can be acoustically loud, especially in homes with open floor plans and no soundproofing between the floors. However, there are ways to help reduce the noise. The first step is to use a thick underlayment. This is a layer of foam, rubber, or fiber placed between the plywood or concrete subfloor and your hardwood flooring to reduce the vibrations that cause noise.

The other solution is to place sound-absorbing rugs in high traffic areas. These rugs will trap the vibrations and absorb some of the impact sounds that would otherwise travel to rooms below. The best rugs are those with thick, dense fibers that can absorb both impact and airborne sounds.

Another way to reduce the noise from hardwood floors is to opt for a glue-down installation method. Glue-down hardwood floors will reduce the movement of the floor and subfloor, which can cause vibrations that create noise. Additionally, using adhesives will help limit the transmission of noise between rooms by reducing vibrations.

It is also important to regularly sweep and mop your wood floors. Dust, dirt, and debris can scratch the finish and damage the floor over time. To avoid this, consider placing doormats at each entrance and putting rugs in high-traffic areas. Additionally, try to avoid direct sunlight, as it can fade the color of your hardwood over time.

Cost

The cost of hardwood flooring varies based on your wood species, thickness, grade and the installation method. A glue-down installation will be more expensive than a floating installation where planks interlock without adhesive.

Natural hardwood floors offer timeless beauty, high resale value and add elegance to any home. They’re also hypoallergenic, meaning they don’t trap dust, dander and other allergens like carpet can. However, the upfront costs can be a deterrent for some homeowners.

Solid hardwood requires more trees than engineered hardwood to make one floorboard, but it can be repurposed or recycled when its lifespan is up, so choosing a sustainably-harvested wood is good for the environment. Engineered wood, on the other hand, utilizes byproducts and scraps of traditional wood manufacturing processes to make its planks, so it requires fewer trees to produce.

Both hardwood options are durable and can withstand heavy foot traffic, but they can scratch or dent more easily than other floor coverings, such as vinyl and laminate. They are also sensitive to moisture and can warp or crack if exposed to high humidity for long periods of time.

Adding an over-sized humidifier to your home can help minimize this problem. For areas of your home that may experience high levels of humidity, consider choosing a different type of flooring, such as a vinyl or luxury vinyl tile (LVT), which can be installed over concrete subfloors.

If you’re interested in installing new hardwood floors, consult a professional installer and choose a premium species of hardwood to ensure longevity. Consider the wood’s Janka rating, which is an indication of its hardness. A higher Janka rating means the harder the wood, the more durable it will be.

Home Improvement

Troubleshooting And Fixing Ceiling Problems

Water leaking from your ceilings can cause structural damage, mold growth, and other problems. It is important to fix these issues as quickly as possible to minimize the amount of damage they cause.

Stains, cracks, and sagging are some of the most common warning signs that your home needs Ceiling Repair.

ceiling repair

Drywall Cracks

Drywall isn’t as strong as the foundation and frame of a home, and it can crack for many reasons. When it does, the cracks are usually visible and can make a room look unfinished. There are several ways to fix drywall cracks depending on the cause, including reinforcing and sanding.

Hairline cracks less than 1/2 inch long can be patched with a thin layer of spackling compound. Apply the compound to the crack with a putty knife, and smooth it until it’s flush with the surrounding wall. Once it’s completely dry, sand the patch until it’s smooth and ready to paint.

Larger cracks need more attention. First, clean the crack by removing any loose drywall, and cleaning the area with a damp cloth. Then, spray a can of adhesive spray on the surface. This will ensure the mud sticks to the crack and doesn’t pull away from it. Next, apply a strip of mesh tape to the crack. Make sure the strip extends past the edge of the drywall. Then, apply a second coat of joint compound over the tape. Make sure to use a wide putty knife when applying the compound, and squeeze out any air bubbles.

Using this method will prevent the crack from coming back, and it will also help the wall look stronger. If the crack is caused by a settlement of the house or drastic temperature changes, it may be wise to add more insulation to your home.

Another way to keep a drywall crack from showing is by adding a strip of paper drywall tape to the crack before re-applying the joint compound. This will prevent the mud from shrinking into the crack and making it even more noticeable.

A final way to prevent drywall cracks is by not hanging heavy items from the walls or ceiling. This will keep the drywall from being pulled down and possibly creating a larger crack. It’s also a good idea to anchor any hanging objects or use wall studs whenever possible. This will spread the weight evenly and reduce stress on a particular spot of the wall or ceiling.

Water Leaks

Water is a life-giving substance that our homes depend on. But when it gets into places where it shouldn’t be, it can quickly damage your home and furnishings. Water leaks are common problems in homes, especially older houses. They often occur due to pinholes in plumbing pipes, but they can also result from minor failures in caulking and other exterior materials. Luckily, many leaks are pretty easy to detect once you know what to look for.

Water stains on walls and ceilings often indicate a plumbing leak. You might notice yellowish or brownish stains, as well as bubbling paint and bulging wallpaper. You could also smell a musty or damp odor, which is indicative of moisture accumulation from a leak. Additionally, you might notice an unexplained increase in your water bill.

These are all signs that it’s time to call a plumber for plumbing repair services. If you don’t catch these issues early, they can lead to extensive and expensive damage in the future.

If you suspect that there is a leak in your home, first make sure to turn off all faucets and showers so you can focus on finding the source of the problem. Then, try a few different methods of detection to see if you can find the source of the leak.

Some types of leaks will be obvious, such as a burst pipe in your ceiling or a bathtub that has overflowed. But other leaks are much more subtle. Some are only visible on your water bill, while others may not cause any noticeable symptoms.

Leaks that can’t be seen are the most dangerous and the hardest to fix, because they can go on for years without being addressed. To help avoid this, check your home’s meter regularly. You might be surprised to discover that a small leak from a worn toilet flapper or a dripping hose is wasting gallons of water every day! According to the Environmental Protection Agency, household leaks account for more than 1 trillion gallons of water waste each year.

Large Holes

A large hole in your ceiling is not only an eyesore, but it could also lead to serious water damage or even structural problems. Fortunately, fixing this type of problem is relatively simple and inexpensive. The key is to take the time to make sure that the repair is done correctly. This will ensure that the hole is both safe and durable.

To begin, you will need to prepare the area for the patching process. This will include removing any loose or crumbling material around the hole and sanding down the surrounding surface. You will also need to apply a primer seal and wait for it to dry before starting the actual repair work. This will help prevent any water from seeping through the repaired surface and causing additional damage.

If you are repairing a hole in a drywall ceiling, it is recommended that you use a self-sticking patch. These can be found at most wall repair stores and are designed to be easy to apply. These patches come in a variety of sizes, starting at about 4 inches and going up to 8 or 10 inches. Once you have chosen the right size, simply cut a piece of drywall that is larger than the existing hole and place it over the damaged surface.

For a more permanent fix, you can use a piece of plywood or cardboard as a temporary cover. This will prevent moisture from leaking through the ceiling and into the room below. However, this option is not ideal and should only be used as a short-term solution until the ceiling is ready for a more permanent fix.

If your ceiling is made from plaster, the best option may be to use a furring strip board. These can be purchased at most home improvement stores or lumber supply shops. They are very easy to work with and will provide a strong and long-lasting repair. Once you have cut a piece of the stripboard to fit in the hole, attach it using a screw gun and drywall screws. Then, apply a few coats of drywall compound to the surface and sand it down before painting.

Mold

A visible mold infestation on your ceiling is a serious problem and requires immediate attention. Mold spores are airborne, and when they land on a soft surface such as drywall or carpet, they can spread throughout the home.

Mold thrives in moist environments and is particularly fond of dark and humid places. If you have a small amount of mold on your ceiling, it may be possible to clean it and re-paint without removing the sheetrock. If you have a larger area, however, it’s best to call in a professional. A mold remediation company will be able to provide you with comprehensive services to get rid of the mold and keep it from coming back.

The first step in dealing with a moldy ceiling is to figure out the source of the moisture. This could be from a leaky roof, a shower that runs for too long, or an ineffective (or non-existent) ceiling fan. Once you determine the source, you can begin to take action to fix it.

In this case, the mold is likely caused by a water leak that has saturated the ceiling and allowed the fungi to grow. It’s important to identify and repair the leaky roof as soon as possible before the mold takes hold because prolonged exposure can cause structural damage to the ceiling and the rest of the house.

If the mold is caused by a water leak, the underlying framing should still be intact and structurally sound. It would require a significant amount of sustained saturation to compromise a floor joist, so the damage should be limited.

It’s also worth noting that black mold can release mycotoxins and allergens into the air. These can irritate the lungs and eyes of people who live in the home, especially children, elderly adults, or those with respiratory illnesses. These chemicals can also affect pets and be harmful to the health of visitors or guests to the home. For these reasons, you should always use a dehumidifier and good ventilation in the areas of your home where mold is present to prevent it from returning.

Home Improvement

Home Remodeling – A Multi-Step Process

Norton Home Remodeling is a multi-step process that requires the help of professionals. Hiring a team of builders, designers and plumbing/electrical experts is key to ensure your project stays on schedule and within budget.

Home Remodeling

Home remodeling can increase the appraised value of your property. A well-done remodel can also improve the look and feel of your house, making it a more appealing place to live. However, it’s important to make smart choices when it comes to what projects to undertake and how much money you can afford to spend. A poorly done remodel could have the opposite effect.

A home’s appraisal value is determined by the values of nearby homes that have recently sold, or “comps.” The comps should be similar in size and features to your home. The comps should also have recent updates that match the type of update you plan to make.

Generally, major remodeling projects are more likely to increase the value of your home than minor remodels. Major remodels include changing a room’s function or structure, such as adding a bedroom or bathroom, or extending a living area. Minor remodels usually involve more cosmetic changes and may be less expensive.

An appraiser will consider a number of factors when assessing your home’s value, including location, size and desirability of the neighborhood, square footage, number of bedrooms and bathrooms, and the age and quality of construction. The condition of the home’s exterior and interior, such as the roof, foundation, and plumbing and electrical systems, will also be taken into account.

The term renovating and remodeling are often used interchangeably, but to housing professionals they mean different things. Renovation is a quick and easy project that doesn’t change a room’s function, whereas remodeling involves structural changes and extensive work. The difference in cost, time frame and permit requirements may affect the amount of value you’ll recoup from your investment.

Before an appraisal, prepare a document that lists all of the upgrades and improvements you’ve made to your home along with their costs and dates. Include copies of any invoices for the improvements. Present the information to the appraiser at the valuation, along with a list of comparable homes in your neighborhood.

Avoid over-improving your home by focusing on the updates that will appeal to the majority of buyers. For example, if the other homes in your neighborhood don’t have crown molding or high-end appliances, you won’t gain much by installing them. Also, avoid spending more than you can recoup at the time of sale.

Improved Energy Efficiency

Home remodeling can be done in a number of ways. The most common include bathroom and kitchen remodels, enlarging rooms to make more use of floor space, adding storage like walk-in closets, room additions, decks and sunrooms, installing energy efficient appliances and windows, and upgrading the home’s lighting. Some of these projects may have a lower return on investment than others, but they are often necessary to improve the home’s functionality. Evaluate your budget, motives, value payoff and future intentions with the home before deciding on how extensive of a remodel to undertake and which specific improvements to prioritize.

Home improvement upgrades that are designed to increase a home’s energy efficiency typically have the highest ROI. These energy-efficient improvements are not only good for the environment but can also save homeowners on their energy bills. These upgrades can range from replacing an entry door or garage door to more major projects such as a new kitchen, bathroom, or roof.

Adding new insulation, sealing air leaks, updating old furnace and water heaters, installing high-efficiency HVAC systems, replacing older windows and doors, and re-siding a house are some of the best ways to make a home more energy efficient. The benefits of these improvements extend beyond a higher ROI to increased comfort and improved indoor environmental quality.

A well-maintained, attractive home can also enhance a person’s mental health and wellbeing. Studies have shown that living in a clean, attractive home can help reduce stress and anxiety levels, which is why many people consider a home remodel to be an investment in their health and happiness.

While home remodeling can increase a property’s value, it is important to plan and research the project thoroughly before beginning. It is also crucial to find the right team of professionals for the job. In addition, homeowners should set a realistic budget and have a contingency fund in case of unforeseen expenses.

It is also important to understand the difference between a renovation and a remodel. While renovations typically involve cosmetic changes and do not change a space’s primary function, remodels can change a room’s entire purpose and layout.

Enhanced Social Life

In addition to improving your home’s value, a luxury remodel is also good for your mental health. This is because a well-designed living space has been shown to boost happiness, improve self-esteem and promote creativity.

A study published in the journal Frontiers of Human Neuroscience found that “people who live in an aesthetically appealing, well-organized environment experience a greater sense of happiness and wellbeing than those who do not.” This study is similar to other studies that have shown that a happy, organized life helps prevent depression and anxiety. Having a beautiful, updated home that reflects your personal style is the best way to achieve this feeling of well-being.

This may be because a well-designed home is more likely to be clean and clutter free. It also allows you to customize your space so that it suits your lifestyle and meets your needs, such as having a reading nook bathed in natural light for book lovers or a playroom for kids.

When you feel comfortable and relaxed in your home, it is easier to socialize with others. You can host dinner parties or entertain friends in your newly remodeled kitchen, dining room and living room that is tailored to your taste and lifestyle.

In some cases, a remodel can even improve your social life by helping you overcome problems that may be impeding it. For example, a leaking shower or broken appliances can lead to stress because you are constantly worrying that these items will continue to break down. A remodel will allow you to make simple adjustments such as lever handles if you have wrist pain or non-slip surfaces to help reduce the risk of injury.

Another benefit of a home remodeling project is that it can encourage you to engage in other healthy behaviors such as cooking and entertaining at home more often. By transforming your kitchen into a functional, state-of-the-art space that is ideal for cooking and entertaining, you can become more engaged in healthy behaviors such as eating a balanced diet or spending time with family and friends.

Better Health

Home remodeling is the process of altering a property’s structure, form, and function. This can include removing walls, building additions, and changing the layout of a room. The distinction between remodeling and renovating is important, as renovations are more cosmetic while remodels entail construction work.

The benefits of home remodeling are numerous. Aside from improving the aesthetics of a property, it can also increase the comfort level. This is particularly important for older adults who may have physical limitations. For example, adding softer floors can help reduce knee, hip, and back pain that is caused by walking on hard tile. Additionally, a kitchen remodel that includes an ergonomic design can improve safety and accessibility.

By making your home more functional, you can lead a happier and healthier life. For instance, having a comfortable family room can help you relax and avoid stress. It can also encourage creativity, which has been linked to improved mental health and a longer lifespan.

Many homeowners have a strong desire to make their homes more appealing and functional but are unsure where to begin. A good starting point is to review a cost-vs-value analysis. This will help you determine which projects are worth your investment and what your budget should be for each project.

In some cases, it may be more economical to re-siding your home or add an additional bathroom rather than invest in a new kitchen. However, it’s essential to weigh your motivations, desired outcomes, and future plans with your home before deciding on the scope of any improvement projects.

Aside from the financial considerations, one of the most important reasons to remodel your home is to maintain its market value. A poorly maintained home can lose value, as potential buyers will be reluctant to pay top dollar for a property that requires major repairs and updates. Ultimately, investing in the renovation of your home will ensure that you get maximum return on your investment when it comes time to sell. Moreover, it will also ensure that you are able to enjoy your home for as long as possible.